The ‘Correct’ iPhone Camera Settings To Get Striking Photos All The Time
Image via Kicking Studio / Shutterstock.com
Being able to capture stunning photos from your smartphone is a valuable skill, as that’s the only “camera” you’re likely to carry around with you these days. Luckily, you can turn your smartphone photography game around with just a few toggles on your settings menu.
In his video, Emil Pakarklis, founder of iPhone Photography School, shows that there are a handful of ideal changes to be made to your iPhone camera settings for consistently high-quality photos.
To get started, simply head to your Settings app, and then scroll down and tap ‘Camera’. You’ll see a number of options on your screen, but you’ll only need to focus on three of them.
The first and most straightward tip is to switch on your grid, which is deselected by default.

Screenshot via DesignTAXI
If you know a thing or two about photography, you’d understand the importance of having the two horizontal and two vertical lines show up on your viewfinder. The grid is a guideline to ensure the composition of your photos is balanced each time you take a picture. For some tricks on composition, head here.
Next, select ‘Formats’ and choose ‘Most Compatible’.
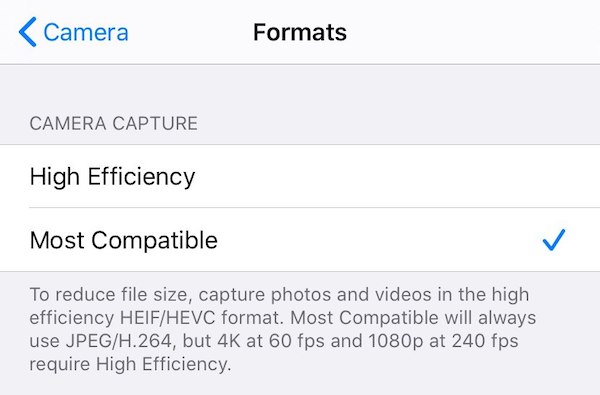
Screenshot via DesignTAXI
Pakarklis explains that ‘High Efficiency’ image file formats refer to HEIF files, which are mostly used by Apple and take up less storage space.
By choosing ‘Most Compatible’ image file formats, you’re converting your images to JPEG, the most popular format in the world. This brings two advantages, the first being that your photos can be viewed by friends and family members who don’t use Apple devices, and the other—and more important factor—being that ‘Most Compatible’ images “actually have more detail, and thus their quality will be better,” Pakarklis details.
Lastly, ensure that Smart HDR—or Auto HDR, depending on the iPhone model you’re using, is switched on.
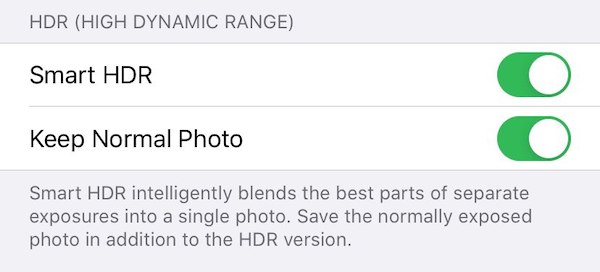
Screenshot via DesignTAXI
Pakarklis turns Auto HDR off in the video, but switches it on again in the viewfinder to explain the differences between HDR and non-HDR photos, so go ahead and leave that on.
He also selects ‘Keep Normal Photo’ to save both HDR and non-HDR copies. This is optional, so you can deselect this if you don’t want duplicates in your camera roll.
By enabling Smart HDR, iOS blends several exposures of the same picture to bring out more details from the scene’s shadows and highlights.
Pakarklis explains the aforementioned settings in the first three minutes of his tutorial, and then explores each button found in the Camera app for the rest of the video.
If you enjoy smartphone photography tricks like these, here’s a cool hack to double the resolution of your images, no matter the brand or model you use.
[via iPhone Photography School, images via various sources]
Also check out these recent news


